Sunday, February 26, 2006
Skittles Part 2
In my last game, I had a sloppy opening as Black but then played the longest combination of my career. Under the time pressure I miscalculated - I thought I had either checkmate or was going to be up a major piece. Sigh. I will take longer, slower win, especially considering that my opponent could have earned a draw via perpetual check earlier!
1. e4 e5 2. Nf3 Nf6 3. d3 b6 4. Nxe5 Bb7 5. Bg5 Be7 6. g3 O-O 7. Bg2 d5
8. Nd2 h6 9. Bxf6 Bxf6 10. Ng4 Bxb2 11. Rb1 Bc3 12. O-O Bxd2 13. Qxd2 dxe4
14. Nxh6+ gxh6 15. Qxh6 f5 16. Qg6+ Kh8 17. Bh3 Qf6 18. Qh5+ Kg7 19. Qe2 Nd7
20. Rb5 c5 21. dxe4 Bxe4 22. f4 Rh8 23. Bg2 Qd4+ 24. Kh1
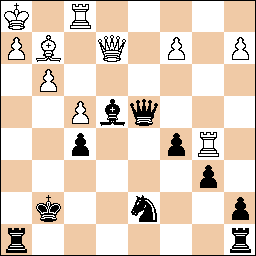
24...Rxh2+! {sacrifice to open the h file}
25. Kxh2 {forced}
25...Rh8+ {White's King is immobilized}
26. Bh3 {forcing the White Bishop into yet another absolute pin}
26...Nf6 {threatening check}
27. Rd1 {threatening the Black Queen - the best move for White}
27...Ng4+
28. Qxg4+ {a forced sacrifice}
28...fxg4 {doubly attacking the pinned Bishop}
29. Rxd4 {gaining back some material, but leaving that Rook enprise}
29...Rxh3+
30. Kg1

30...Rxg3+ {netting another pawn before taking the hanging White Rook}
31. Kf2
31...Rf3+ {protecting the Black Rook with tempo}
32. Ke2
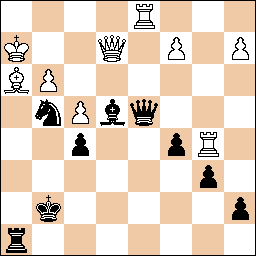
32...cxd4
{Now White can get a pawn back, but his second rank weakness
ultimately concedes two more pawns.}
33. Rg5+

33...Kf6 34. Rxg4
{Here it would have been stronger to push the d4 pawn, but
I found a simpler trade-down plan along Black's seventh rank}
34...Rc3 35. Rg8 Rxc2+ 36. Kd1 Rxa2
37. Rf8+ Ke7 {chasing away the Rook} 38. Rh8 b5 39. Rb8 a6
{White resigns} 0-1
Not bad for blitz.
TCT Results | Circle 1 | Circle 2 | Circle 3 | Circle 4 | Circle 5 | Circle 6 | Circle 7 |
| Step 1 | 97% | 99% | 99% | 100%r | |||
| Step 2 | 93% | 96% | 95% | 97% | 96% | 99% | 100% |
| Step 3 | 93% | 97% | 97% | 96% | 96%* | 99%* | 100%* |
| Step 4 | 80% | 86% | 90% | 92% | |||
| Step 5 | 74% | 77% | 83% | 87% |
Wednesday, February 22, 2006
Skittles
I don't consider blitz to be real chess, but it's fun. Surviving the time-pressured, mistake filled, frenzied play can really give me a high, when I win that is. Looking at blitz games afterwards continues to highlight BIG gaps in my play, as well as putting things into perspective. Take this position for example:
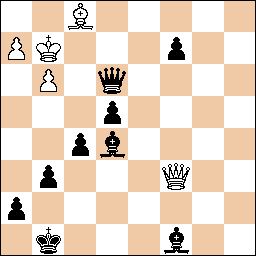
It's actually horrible, and that's just what I did. To prove the point that chess is all about mistakes, my opponent ignored the perpetual check:
41.Qe8+ Kg7 42.Qe7+! Kh6 43.Qh4+ Kg7 44.Qe7+ etc. 1/2-1/2
2b3k1/7p/2Q3p1/4bp2/4p3/4q1P1/6KP/2q2B2 w - - 0 1
I guess a win is a win.
-=-=-=-=-
I am starting circles 5 through 7 on TCT Step 3. My focus is on keeping a "game-like" mental approach throughout, which is more difficult than it might sound.
I wanted to say I have noticed that there are many and interesting games and discussions posted recently in the chess blog-o-sphere. Very cool :-D.
Saturday, February 18, 2006
Step 2 Complete
I am taking a short break before Step 3.
-=-=-=-=-
[Event "Aeroflot Open"]
[Site "Moscow RUS"]
[Date "2006.02.12"]
[EventDate "2006.02.08"]
[Round "5"]
[Result "1-0"]
[White "TL Petrosian"]
[Black "P Smirnov"]
[ECO "B85"]
[WhiteElo "2558"]
[BlackElo "2614"]
[PlyCount "62"]
1. e4 c5 2. Nf3 d6 3. d4 cxd4 4. Nxd4 Nf6 5. Nc3 a6 6. Be3 e6 7. a4 Nc6 8.Be2 Be7 9. O-O O-O 10. f4 Qc7 11. Kh1 Re8 12. a5 Nxa5 13. e5 dxe5 14. fxe5 Qxe5 15. Bf4 Qc5 16. Na4 Qa7 17. Be3 Nd5 18. Bg1 b5 19. Bd3 Bf6 20. Nxb5 Qd7 21. Nbc3 Bd8 22. Nc5 Qc7 23. Nxd5 exd5 24. Rxa5 Qxa5 25. Bxh7+ Kf8 26.Qxd5 Ra7 27. b4 Qb5 28. c4 Qxb4 29. Qd6+ Be7 30. Rxf7+ Kxf7 31. Qd5+ 1-0
Fritz:
3. d4 cxd4 4. Nxd4 Nf6 5. Nc3 a6 6. Be3 e6 7. a4 Nc6 8. Be2 Be7 9. O-O O-O 10.
f4 Qc7 11. Kh1 Re8 12. a5 Nxa5 13. e5 dxe5 14. fxe5 Qxe5 15. Bf4 Qc5 16. Na4
Qa7 17. Be3 {last book move} Nd5 18. Bg1 b5 (18... b6 $5 19. c4 Nb4 $15) 19.
Bd3 $11 Bf6 (19... Qd7 $5 {is worth consideration} 20. Bxh7+ {
Demolition of pawn structure} Kxh7 21. Qh5+ Kg8 22. Qxf7+ Kh7 23. Qh5+ Kg8 24.
Qf7+ Kh7 25. Qh5+ Kg8 26. Qf7+ $11) (19... bxa4 $2 20. Bxh7+ Kf8 21. Nxe6+ Bxe6
22. Bxa7 Rxa7 23. Bf5 Bf6 24. Bxe6 fxe6 25. Rxa4 Nc6 $18) 20. Nxb5 $16 {
Clearance to allow g1-d4} Qd7 (20... axb5 21. Rxf6 gxf6 22. Qg4+ Kf8 23. Bc5+
Re7 24. Bxh7 Ke8 25. Qg8+ Kd7 26. Bxa7 Rxa7 27. Nc5+ Kc7 28. Be4 Kb8) 21. Nbc3
Bd8 $2 (21... Nxc3 $142 {and your king hangs on} 22. bxc3 Bd8 $14)
22. Nc5 $18 Qc7 $4 {your bishop has lost his nerve...
understandable when you consider his position}(22... Qe7 23. Nxd5 exd5 $18)
23. Nxd5 exd5 24. Rxa5 $1 {the end, the rest is history}
Qxa5 {Decoy theme: a5} (24... Re5 {doesn't change the outcome of the game}
25. Qf3 $18) 25. Bxh7+ $1 {Demolition of pawn structure}
Kf8 (25... Kxh7 {Decoy to h7} 26. Qh5+)
26. Qxd5 Ra7 27. b4 $1 {leaving no more doubts}
Qb5 (27... Qxb4 {Decoy to b4} 28. Nd3 {Discovered attack}
Qe7 29. Ne5 g5 30. Ng6+ Kg7 31. Nxe7 Rexe7 32. Qxd8 Kxh7 33. Qxc8)
28. c4 Qxb4 (28... Qb6 {the last chance for counterplay} 29. Nd3 Be6 $18)
29. Qd6+ Be7 30. Rxf7+ $3 {Demolishes the pawn shield.} Kxf7 {Decoy theme: f7}
31. Qd5+ {A classical mating theme} (31. Qd5+ Be6 32. Qxe6+ Kf8 33. Qg8#) {
Fritz 8: 1)} 31... Be6 ({Fritz 8: 2)} 31... Kf8 32. Qg8# {[%eval 32766,0]}) ({
Fritz 8: 3)} 31... Kf6 32. Ne4# {[%eval 32766,0]}) 32. Qxe6+ Kf8 33. Qg8# {
[%eval 32765,0]} 1-0
-=-=-=-=-
Through no fault of my own I won an incredibly inaccurate Cochrane Gambit blitz game as Black. If you look at the main line of this opening, you might conclude that it was concocted by space aliens. Granted, it can be a real test of Black's defensive skills, and even more so in blitz.
Luckily, my opponent gave me an almost obvious checkmate opportunity, an opportunity which I squandered by offering up my Queen instead of my Rook. Not to be outdone, my opponent let me keep my Queen, continuing on embarrassingly until he finally handed me a checkmate so obvious I couldn't refuse. This last blunder was avoided a position where he was materially behind but had a big pawn center, i.e. objectively lost but still with promotion threats. Here is the checkmate position and solution right underneath:

Rg6+! (not Qg6+?? as I played) seals the deal:
Rg6+! fxg6 (as Rg2 Rxg2+ or Kh1 Qh8+ Rh2 Qxh2! Kxh2 Rh8#)
Qxg6+ (as Rg2 Qxg2#) Kh1 Rh8+ Rh2 Qg2!#
Computer analysis of Qg6+:
26. fxg6 Rxg6+ 27. Kh1 Rh8+ 28. Rh2 Rxh2+ 29. Kxh2 Nf3+
30. Kh3 Ng5+ 31. Kg3 Nxe4+ 32. Kf4 Nxc5 33. Kxe3
This leaves White up two pawns and a good position
1. e4 e5 2. Nf3 Nf6 3. Nxe5 d6 4. Nxf7 Kxf7 5. d4 c5 6. Bc4+ Be6 7. Bxe6+
Kxe6 8. d5+ Kf7 9. Nc3 Be7 10. O-O Rf8 11. f4 Nbd7 12. Qf3 Kg8 13. g4 g5
14. f5 Ne5 15. Qh3 Nfxg4 16. Qh5 h6 17. h4 Nf6 18. Qxh6 Nfg4 19. Qe6+ Kg7
20. hxg5 Bxg5 21. Nb5 Qe8 22. Qxd6 Bxc1 23. Raxc1 Ne3 24. Rf2 Rf6 25. Qxc5
Qg6+ 26. Kh1 Qh5+ 27. Rh2 Qf3+ 28. Kg1 Qg3+ 29. Kh1 Nf3 30. Qe7+ Rf7
31. Rh7+ Kxh7 32. Qxf7+ Kh8 33. Qf6+ Qg7 34. Qxg7+ Kxg7 35. Re1 Rh8# 0-1
I hope to work through my unsound Queen sacrifice propensity. May its siren lure call me no more :-).
-=-=-=-=-
TCT Results | Circle 1 | Circle 2 | Circle 3 | Circle 4 | Circle 5 | Circle 6 | Circle 7 |
| Step 1 | 97% | 99% | 99% | 100%r | |||
| Step 2 | 93% | 96% | 95% | 97% | 96% | 99% | 100% |
| Step 3 | 93% | 97% | 97% | 96% | |||
| Step 4 | 80% | 86% | 90% | 92% | |||
| Step 5 | 74% | 77% | 83% | 87% |
Saturday, February 11, 2006
Nearly Through TCT Step 2
It's approaching the finish line on this circle stuff. At this stage I have shifted into taking my time with each problem so I burn in the most useful aspects of each position.
For fun I have been sneaking in some blitz, tried to make heads or tails of handling the Blackmar-Diemer Gambit as Black, and finally finished the third game in the McDonald book. In that game between Kasparov and Bacrot, Black gets into an incredibly passive situation for awhile before crumbling. I hate that! In a manner that seems very parallel to what Pawn Sensei recently posted about when GMs blunder, I'll say that seeing one of today's top players suffer this way puts my own experiences into a more positive perspective.
-=-=-=-=-
TCT Results | Circle 1 | Circle 2 | Circle 3 | Circle 4 | Circle 5 | Circle 6 | Circle 7 |
| Step 1 | 97% | 99% | 99% | 100%r | |||
| Step 2 | 93% | 96% | 95% | 97% | 97%* | 98%* | 100%* |
| Step 3 | 93% | 97% | 97% | 96% | |||
| Step 4 | 80% | 86% | 90% | 92% | |||
| Step 5 | 74% | 77% | 83% | 87%* |
Thursday, February 02, 2006
Simultaneous Advantage
Introduction
Tactical Terminology
Since reading The Mammoth Book of Chess I have been using Burgess' tactical terminology in puzzling through difficult chess positions. This helps when I cannot understand an answer to a tactics problems, or when get stumped reading annotations comprised of variations with no supporting text. I hope that explaining these to myself "verbally" I will grasp the idea better.
Along the way, I have become somewhat non-standard in my tactical language. Naming tactics differently and seeing multiple tactics where others don't are my two biggest deviations from the norm. I have investigated both of these issues deeper, and this has led me to developing a new system for describing tactics.
Part I
Which Tactic is This?
White to Move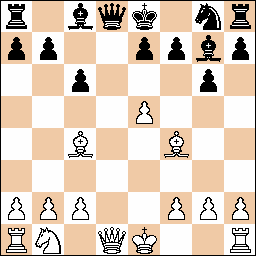
Tasc Chess Tutor, Step 2 Exercise 5b, #9
Answer: Bxf7+
What you call the Bxf7+ sacrifice depends on how you were taught. I seems ambiguous that might be called one or more of the following:
- Decoy
- Chasing
- Overworked defender
- Overloaded defender
- Deflection/Distraction
The most common response is that this is a decoy. This is like saying, "Moving the Black King to capture the Bishop is fatal for Black's Queen." I view this as a deflection, which is like saying, "The Black King's most important duty is to defend the Queen, and yet he moves away.". If the Black King was a Queen, it would look more like an overworked piece. I could see how someone could view these as chasing or overloading.
Aspects of Multiple Tactics
Another ambiguous area of is multiple tactics. I see this everywhere, or perhaps more accurately aspects of multiple tactics, although it's rarely described that way. Take this obvious checkmate in two for example:
White to Move
Rxh3+ gxh3 Rh3#
Four aspects seem to stand out in this position:
- Rxh3+ gets the g3 Rook out of the way of the d3 Rook, getting White ready for the final checkmate move
- Rxh3+ sacrifices a Rook for a pawn, a pawn that block's part of the h-file
- gxh3 draws a defender away from protecting the h3 square
- gxh3 turns a defender into a target on the h3 square
What do you call this kind of sacrifice for checkmate? Putting that question aside, is this multiple tactics? There is no hard and fast rule on what qualifies as multiple tactics, and few would give it that label. I personally like calling this outnumbering. Still, using a more common name for the initial Rook sacrifice leaves out those four aspects.
Part II
Simultaneous Advantage
Because of the two above ambiguities, I was at an impasse. My tactical descriptions were going to differ from the norm, and labeling many moves as multiple tactics would make things worse. As well, using other umbrella terms wasn't a satisfying solution, and that approach seemed too broad. I needed something else.
I focused on breaking things down further. I originally set out to categorize everything I knew about tactics: material gain, tempo related tactics like zugzwang and zwischenzug, forced mates, etc.. Just talking about forced moves brought up essentially forced moves, and so on. Unfortunately this list was too vast.
I finally focused exclusively on forced checkmates that start with a sacrifice. I set out to make an unambiguous vocabulary that was capable of tracking all of the tactical aspects in these positions.
I ended up with a simple 2x2 grid and viola all the parts began fitting together. I started with this:
Simultaneous Advantage When Sacrificing for Checkmate
move | away from a square | onto a square |
attacking piece | advantage(s) | advantage(s) |
defending piece | advantage(s) | advantage(s) |
This grid combines the attacker's plusses and the defender's minusses. An advantage is anything in the position that changes beneficially for the attacking side:
- the attacker's liability becomes a neutrality
- the attacker's liability becomes an asset
- the attacker's neutrality becomes an asset
- the defender's asset becomes a neutrality
- the defender's asset becomes a liability
- the defender's neutrality becomes a liability
The grid pinpoints the exact moment that an advantage is obtained. Each box has zero to many advantages written in it.
Here is my current draft of the advantages list and three detailed examples using it:
move away from a square onto a square attacking resulting checkmate threat resulting checkmate threat defending resulting checkmate threat resulting checkmate threat
piece
King's flight squares
King's flight squares
King's flight squares
King's flight squares
piece
King's flight squares
King's flight squares
piece
absolute pin
more vulnerable square
the King's flight squares
the King's flight squares
Notes:
It is assumed that the best offense and defense is used.
"Discovering" means a blocking (or masking) piece is moved, increasing the influence and mobility of one or more long-range attacking pieces. When this action occurs, one or more advantages are ascribed to it. "Discovering" is being used broadly here, as it includes situations where two long range pieces that form a battery move away from one another and where a Rook or Queen is behind a pawn that advances forward.
"Moving into an absolute pin" inherently implies that the piece has also moved into a capture that gives check, and this is treated differently from "moving into capture". Having both of those in a box means that in addition to the pinning threat, one or more other pieces are threatening to capture.
"Outnumbering" is similar to winning material by outnumbering an opponent's piece with more attackers than defenders. Here it means an attack on a square, so capturing is not required. The idea is that with more attackers than defenders trained on that square, an attack or interfering block from that square will succeed. This happen at any point, on either the attacker's move or the defender's move. If outnumbering happens on the defender's side, it might be thought of as overloading.
"Preventing counterattack" could be broken down further: preventing checkmate, check, perpetual check, perpetual chase, threats to capture pieces necessary for the final checkmate position, and threats to block pieces necessary for the final checkmate position. That list also applies to "withdrawing counterattack" advantage, which additionally includes unpinning one of the attacker's pieces, meaning both relative and absolute pins.
In "threatening check", the term "check" means threatening the defender's King with check or checkmate. When it occurs, further calculation is required to determine if it truly is a checkmate threat.
-=-=-=-=-
White to Move
Rxh3+ gxh3 Rh3#
Initial Advantages:
- Outnumbering to attack on h3
- Black King is on a vulnerable square for checkmate
- Black King only has the h7 flight square
- White threatens check on d8 and h3
move | away from a square | onto a square |
White: Rxh3+ |
|
|
Black: gxh3 |
|
resulting checkmate threat: Rxh3# |
White: Rxh3+ |
# |
-=-=-=-=-
White to Move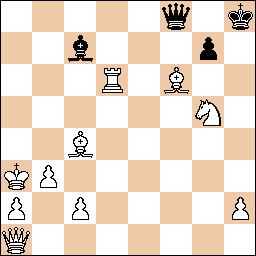
Bxg7+ Qxg7 Rh6#
Initial Advantages:
- Black King is on a vulnerable square for checkmate
- Black King has no flight squares
- White threatens check with Bxg7+ and Nf7+
move | away from a square | onto a square |
White: Bxg7+ |
|
|
Black: Qxg7 |
resulting checkmate threat: Rh6# |
|
White: Rh6# | # |
-=-=-=-=-
White to Move
Rxc6 Rxc6 b5/Rxc6 Bxa4 Qxa4
Initial Advantages:
- Black King is on a vulnerable square for checkmate
- Black King has no flight squares
- White threatens to capture on c6, d1, and e2
- White threatens check with b5
move | away from a square | onto a square |
White: Rxc6 |
resulting checkmate threat: b5# | |
Black: Rxc6 ------ Bxa4 |
|
resulting checkmate threat: Qxa4# |
White:
------ Qxa4# |
| #
# |
-=-=-=-=-
I find it striking that the first example has something in each of the first four boxes, something that it shares with the second example. Also striking is how few advantages were in boxes the third example, ...Rxc6 variation; most of the required advantages for checkmate were there to begin with, so this makes sense.
Part III
Common Knowledge
A well-disciplined player will typically do several things each turn:
- Determine if he can checkmate is opponent
- Determine if he must stop a checkmate threat
- Play for advantages appropriate to the position and stage of the game
In checkmate situations material superiority is meaningless, and as such it really isn't discussed in depth in chess books. Nonetheless, I think it deserves consideration. It seems that (at least) two modes of thinking are employed each turn, which I will call "checkmate thinking" and "non-checkmate thinking". These modes are very different, and confusion usually spells disaster. Not using checkmate thinking when it's an important part the position leads to mistakes: miscalculating checkmate threats because it looks like it loses material, ignoring checkmate threats for one side, etc.
Material
Material advantage is the biggest winning factor in non-checkmate thinking because it often leads to a win. The relative values of each piece is well known in its most simplistic form:
Material Values

I think the other mode of thinking deserves its own table:
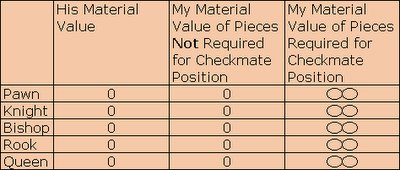
It's almost simpler to consider checkmate-thinking values, as it's a specific all-or-nothing ordeal (the "8" symbol on it's side means infinity). Having some material be worth 0 implies alot of things. Gain and loss have no meaning, and there is no way to sacrifice material per se, leaving only participants in the final checkmate position as having value.
Rewording
I started this investigation out mapping out all the different possible sacrifices for checkmate. I thought I was getting to the conclusion that all of these appear to be sacrifices for position, a well known idea.
Based on material devaluation in checkmates, I thought of changing the conclusion and call them exchanges for position. This would make the overall idea akin to even trades in non-checkmate situations, so giving up a full Queen potentially could be considered equal to getting a Queen for a pawn.
Next I thought, "What if the attacker doesn't sacrifice to start with, or maybe simply never sacrifices to achieve checkmate?" The grid still worked. Perhaps these all were forced checkmates.
Finally, allowing for the possibility that the defense could make an unforced blunder, it seems like these are simply checkmates. So here is the same grid, different title, now without the requirement to sacrifice or trade material:
move away from a square onto a square attacking resulting checkmate threat resulting checkmate threat defending resulting checkmate threat resulting checkmate threat
piece
King's flight squares
King's flight squares
King's flight squares
King's flight squares
piece
King's flight squares
King's flight squares
piece
absolute pin
more vulnerable square
the King's flight squares
the King's flight squares
The name "Theory of Simultaneous Advantage" came out of the realization that the most difficult tactical moves frequently involve multiple things happening on just one move. It is still under development, and it currently appears to be more like a vocabulary system than a theory. One thing that I am stating that does appear to constitute a theory is this:
The only way to achieve checkmate is through Simultaneous Advantage
In terms of the opening, the most instructive games are filled with moves that fit right into this kind of theory. Just think about the typical annotated game after 1. e4 e5 2. Nf3 Nc6 3. Bb5 . Authors rave about White's castling preparation while threatening to inflict doubled pawns upon Black and hang the e5 pawn. This has been exhaustively studied, and it turns out that the 5. Nxe5 threat can be dealt with. Usually the prospect of handing Black a two Bishop advantage usually makes White choose not to capture on c6 on the next turn. Viewing the position in an immediate sense, the two Bishop advantage wouldn't immediately become a meaningful plus in the postion for Black if White trades his Bishop for the c6 Knight, so I can see it argued that White has achieved at least two if not three simultaneous advantages on move 3.
Normal Checkmates in the Theory of Simultaneous Advantage
To achieve checkmate the advantages all of these advantages must be accrued by the mating side before the last move:
The mating side has
1. the move
2. mobility to move the mating piece to the the mating square or, in the case of a discovered mate, has the mating piece on the mating square and has mobility to move masking piece off the mating line (i.e. it's not trapped)
3. a way out of check if he is in check. This move will deliver a discovered mate by having the mating side's King either capture the checking piece or move safely away leaving the defending side's checking piece, leaving that piece unable to stop the checkmate because of an absolute pin. This is here for completeness, as the situation is extremely unlikely to occur naturally:
White to move, and Black cannot interpose his pinned Queen to stop mate in 1.

Returning to the list of advantages...
The defending side has
1. a King must on a vulnerable square
2. either all of his King's critical flight squares eliminated by his own pieces, the edge of the board, or being controlled by a mating side piece or is about to have them completely removed as a result of the upcoming mating move
3. no effective attack on the mating square
4. no available piece that can interpose between the mating square and the King in long-range checkmates
Tactics
In closing, here is a rough mapping of where common tactics fit on the grid:
| Move | ... away from a square | ... onto a square |
| my piece |
|
|
| his piece |
|
|
Sources:
- Tasc Chess Tutor version 2.01,Tasc B. V. Holland 1995-1999
- The Mammoth Book of Chess by Graham Burgess, Carroll And Graf 1997, 2000
-=-=-=-=-
please leave a comment.
![]()

